2012 Stone Wall Workshops

Charley MacMartin, owner of Queen City Soil and Stone, and all around great guy will be continuing his popular winter workshop series in our shared greenhouse starting in January. Please read Charley's message below for more information.

Stone wall workshops. Our introductory stone wall building workshops for homeowners and tradespeople promote the beauty and integrity of stone. The one-day, hands-on workshop focuses on the basic techniques for creating dry-laid walls with a special emphasis on stone native to Vermont. Workshops are held inside warm greenhouses in Hinesburg. The first workshop date is Saturday, January 14, 2012, and workshops continue through March 2012. The one-day workshop is $100. Space is limited. For complete schedule and registration information, go to the link www.queencitysoilandstone.com/workshops.html or contact Charley MacMartin, 802-318-2411.

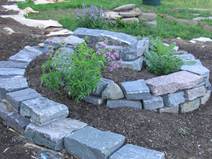
Herb Spiral Workshop


Our retail greenhouse is co-owned with a wonderful business also located at the same site. It is Queen City Soil and Stone, owned by Charley Macmartin of Burlington. Not only is Charley one of the nicest people you could ever meet, he is also the talent behind all of the stone work you see in our parking area and our lovely display garden. Charley uses the retail greenhouse as the home of his winter workshop series for homeowners and landscape professionals who want to learn or perfect dry wall masonry. The first workshop in this series is a perfect one for the Red Wagon Plants community since it is focusing on herb spirals. These simple and elegant structures are a great way to plant lots of herbs close to your kitchen door and in such a way that you give each herb the type of micro-climate it craves. Herb spirals provide various conditions in one small space - dry and sunny, shady and moist and everything in between.

Here is Charley's description of the upcoming workshop :

Queen City Soil & Stone’s series on garden stone features continues in November with a workshop on herb spirals. An herb spiral is a stone wall twisted in on itself creating a garden bed of varying soil depth and planting possibilities from kitchen herbs to strawberries to cut flowers. The workshop will be held at Red Wagon plants in a heated greenhouse on Saturday, November 12, from 9am to 2pm.

The cost of the workshop is $50 and space is limited. To sign up, call Charley MacMartin at (802) 318-2411.


The workshop will be hands-on:  building an herb spiral, discussing herb spiral design and learning about the plantings that a spiraling garden bed allows.


Apple Pie Beats Chores

When today rolled around, I had lots of good intentions to do a bunch of garden chores, exercise, get some office work out of the way, and lots of other tasks that good intentions depend upon. But instead, the chores, tasks and lists took a back seat to making an apple pie with my daughter.

She made her first crust, which I learned from my father, which he learned from Molly Stevens, and you can learn how to make it by reading this. Yes, that is right, 3 sticks of butter for a double crust pie. Gulp. Hope to get in that exercise.

The apples came from Boyers' Orchard in Monkton, and they were just tossed with a little lemon juice, sugar, and cinnamon. Nothing fancy. The beauty of apple pie lies in simplicity. Getting me to agree to cinnamon and a double crust is about as wild as I will go - I would rather have an apple tart, single crust, with unadorned thinly sliced apples arranged in a pretty pattern. But I suppose that is the French in me.


A little egg wash goes on the crust, and vent holes are made to let out the steam so the crust does not turn to a watery mess. The beautiful creation goes into a 475F oven for 10 minutes, then lower the heat to 425F. Check on it after 20 minutes or so, but it usually takes an additional 40 minutes or so to cook.  I often turn the heat down one more time for the last 20 minutes.


Garden Chores this Weekend

The time to get things done in the garden is shrinking. My good intentions are to get lots done this weekend. Here is what I have lined up for this weekend in the garden: Fill the new raised beds that I just put in the back yard.

Get soil ready for garlic planting.

Finish planting shrubs along the fence line between our yard and our neighbors' new barn. I am planting Ilex verticulata, or winterberry. The bright red berries are a nice contrast against the wooden building and will bring lots of birds to the yard.

Add compost to some new flower beds for next year.

Turn the compost pile.

What do you have planned?

Garden Breakfast for a Cold and Rainy Day

The weather's turning and so is my attitude towards the kitchen. In summer, I would rather be outside, just like you, and it can be hard to make time for all that garden produce to make it into anything but some quick salads and grilled dishes (at the beach, no less).  Here is a great dish that works for breakfast, brunch, lunch, dinner and pretty much anything in between. I made a big batch last Sunday and it kept us happy pretty much all day.

A green bean and ham hash - take some of those older green beans from the garden (the ones that did not get killed by the frost because they were hiding under the cover of leaves) and chop them up into 1/3 inch pieces. I like Romano beans for this, the wide and flat kind that is loaded with extra flavor and can be cooked a long time if you like a slowly simmered green bean, which I do, in case you are asking.  Chop up an onion, some garlic, and a potato. Chop everything pretty small, this is hash, not stir-fry. Heat a tablespoon or so of olive oil, add the onion, garlic and potato and cook until starting to soften, about 8 minutes over medium heat to high heat. I also added pimenton, a smoked paprika, at this point. If you don't have any, a little sweet paprika and cumin might be nice. Keep stirring the onions, garlic and potatoes every minute or so, but letting it all stick a little and brown is okay - that is how you build flavor. Once the potato is softened somewhat, add the chopped or sliced green beans, some chopped ham (I bought an incredible petite ham from Bread and Butter Farm last week) and a good splash of cooking sherry, white wine, broth or water (my order of preference for the liquid). Scrape the pan so the browned bits get incorporated into the liquid, lower the heat, and put a lid on the pan. At this point, the vegetables are both sauteeing and steaming. Wait about 10 minutes hear, stirring once or so and adding another splash of liquid if it is getting very dry. Add salt and pepper to taste, after 10 minutes, and a splash of cream, half and half, or milk - the dairy helps bind all the flavors and keeps the vegetables from getting dry.  Stir and sautee another 5 mintues or so, adding another splash of dairy as needed, and that is it.  This is great served with an egg on top, over easy or over hard, or scrambled on the side. But really, it is great on its own with nothing else and will keep you going for the whole day. So you can go out and pick apples, take a hike, put the garden to bed, and all the other stuff that still keeps you outside a little longer. Winter is not here yet!

High Priority - Roasted Ratatouille for the Freezer

I have to admit that I don't love frozen vegetables for the most part. So if you have a favorite way to freeze a vegetable from your garden, please share it with me. Here is one I like and eat willingly out of the freezer come the dark days of winter. I want to share this simple thing with you in hopes you might have a similar beloved thing to pass on to me. For some reason, this year has not been a year when I put up a lot of food for winter. A few jars of tomatoes and this amazing thing I will now show you are the only things I have done. No beans, no salsa, no jams, no chutneys. Well there is still time, so maybe I will play catch up and do a plum chutney with the amazing plums passed on to us by our friend, Yvan.

This recipe starts in the spring. I basically plan part of my garden just so I can have all the right veggies to make this. You need

  • onions

  • garlic

  • peppers

  • eggplant

  • tomatoes

  • zucchini or summer squash

The garlic gets planted the previous fall, the onions go in in late April, and everything else goes in June 1. I like to freeze about 10 to 20 quart bags of this ratatouille, so I usually plant about 6 pepper plants (3 Ace and 3 Italia) ,  6 San Marzano tomatoes, 6 eggplants (usually a combination of Listada di Gandia, Orient Express, and Hansel), and 1 zucchini plant ( I do two plantings, one June 1 and one July 1 that way the plants are always healthy). Most households do not need more than 1 zucchini plant. Really.

Harvest all the veggies, wash them well. And start chopping. This year, I was a bit lazy and bought a few disposable pans to do the roasting. It made for easy clean up, but the veggies did not caramelize as much as they would have on metal or pyrex. Lesson learned.

So basically you just chop up all the vegetables into 1" chunks or so. The proportions are different every year, but it is usually about 1 part onions, 1 part peppers, 3 parts eggplant, 2 parts tomatoes, and 2 parts zucchini. I chop everything separately and then add it to the pans. I then drizzle olive oil over every thing. Add lots of salt, good sea salt is best, and then handfuls of chopped herbs to each pan. I like a blend of thyme, oregano, and rosemary. But other combinations work well.

Preheat the oven to 375F and slide in the pans. Turn and toss every 20 minutes, until everything is cooked and starting to caramelize. The overall cooking time really depends on the amount you are doing, the type of pan you are using, the thickness of the vegetable layer in each pan, etc. Basically, cook it until the whole house smells really good and the veggies are very soft and starting to brown. If I were making this for a meal to be eaten that night, I would do a single layer, in pyrex, and let it get golden brown. This is much harder to do in big batches in a home oven, and since freezing compromises texture and flavor anyhow, I think of these roasted veggies as additions to other recipes all winter long, not the main showcase in a meal.

Once everything is cooked, let it cool down completely, and then carefully scoop it into plastic quart-sized freezer bags. I usually use a measuring cup and one of those funnels for jars, since it makes life a little easier. Once frozen, the veggies can be used in pasta sauces, on pizza, in lasagnas, in soups and stews, as fillings in calzones, or as a topping for polenta, etc. You get the picture. It's such a nice way to have a little taste of summer in the winter and uses up so much of that amazing garden produce. Even in a summer like this one, when I have had to take some time away from gardening and preserving, I made sure to do some of these roasted veggies for the freezer.

This blog post was written by Julie Rubaud.

Best-dressed pasta goes for the layers

Turn on the oven - 400F. Go to the garden and look for cherry tomatoes.

Take lots of said cherry tomatoes and cut them in half and dump them into a glass or pyrex baking dish, a big one, so that they are in a single layer.

Add some finely chopped cipollini onion. Or red onion, or sweet onion, or any kind of onion really.

Add a few or more tablespoons of olive oil. A good one. Don't skimp here, you want everything well coated, slippy-slide like.

Grab some herbs like savory, rosemary, oregano, sage, (and/or) thyme and chop them up finely or coarsely, depending on the look you want and your tolerance for stems in food.

Add plenty of good sea salt.

Toss together and slide pan into a pre-heated 400F oven. Forget about it for a good 45 minutes. Check and stir / flip once, about half way through. It will start to get caramelized and yummy. You can do this ahead of time and just let it sit in the turned-off oven for a while. Gets better with time, promise.

Meanwhile, do the second flavor layer......

Heat up a generous amount of olive oil in a heavy saute pan (1/2 cup or so).  I used cast iron and it was lovely.

Chop up some sweet onion, red pepper, hot pepper.  (If you need quantities, try 1 medium onion, 1 large red pepper or 2 small, 1 jalapeno or cherry bomb or 2 thai hot peppers, or more to taste. No rules here.)

Add onion and peppers to hot olive oil, and let it fry for a while. Stir every now and then. These will sizzle gently for about 10  minutes. They will soften, get fragrant, etc.

Chop up about 6 cloves of garlic.

Chop up about 4 tablespoons of herbs - a combo of oregano, sage, rosemary, thyme is nice. But really, any woody, fragrant herb will do here.

Find some paprika. My favorite is Pimenton (the smokey kind) but if you don't have that, you can use sweet or hot (if you can take the heat.) If you don't have any paprika at all, just skip it; the dish will be good without it.

Add garlic, paprika, herbs, and about 1/2 tsp salt to olive oil and peppers in the pan.  Stir, and turn down the heat. This will simmer together another five minutes or so over low heat. More time is fine. But 5 minutes is the minimum. Again, expect fragrance here.

You can get the pasta water going at this point.  You know...big pot, lots of water, salt.

Once pasta water is boiling, add the pasta. However much you need and while it cooks finish off the sauce.

Here is how:

Squeeze a lemon. Turn sauce # 2 off ( the one on the stove, not the one in the oven) and take it away from the heat. Add the lemon juice. It may sizzle a bit, so stand back. Stir together. Add some chopped parsley or basil (one or the other, not both, please).

Take roasted cherry tomatoes out of oven. Add the sauteed peppers and herbs to the tomatoes, scraping up every savory bit. gently and lovingly merge the two sauces. Serve in a bowl with a nice small ladle.

This is a rich, olive oil intense sauce. Use sparingly over the pasta with lots of freshly ground black pepper. The flavors add up to more than the sum of the parts. Really.

Some possible additions, if you must:

  • anchovies ( with the peppers and onions on the stove)
  • olives (pitted and chopped, added at the end with the lemon juice)
  • capers (can be added at the beginning or at the end. Gives you two different flavors either way, experiment with which you like best).
  • scallions (toward the end of the cooking time in either of the two sauces)
  • freshly grated parmesan (to pass around at the table)

But really, the beauty of this sauce duo is the simplicity. Don't overdo the flavors right off the bat. Try it as is. Just swoony and simple.

 

Frost Dates in Vermont - South Hero is the Winner!

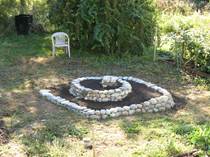
Here is a great chart that analyses all the temperature data collected in Vermont over the years and gives us the probability of dates for first and last frosts around the state. South Hero and the lake Champlain Islands have Vermont's longest growing season (measured by number of frost-free days according to N.O.A.A).  Take a look and prepare your garden for those first frosty nights. Here is what I do at my house to prepare for those first frosts:

If it is a really early frost, (September in Hinesburg), I will harvest all the ripe fruit on the heat loving plants (squashes, tomatoes, peppers, eggplant, etc) and if the plants still look healthy and have lots of unripe fruit, I will cover the plants with row cover. You can use sheets, blankets, plastic sheeting, etc. If the frost is coming at a later point, I often won't bother with the plant protection - just harvest all the fruit (green tomatoes can ripen indoors) and call it a day!

I don't bother to protect lettuce unless the first frost is very cold and very early. Lettuce can handle a few light frosts, so it is usually not a problem early on. Later in the season, I set up some simple wire hoops and keep the lettuce under row cover for the remainder of the season. This allows fresh lettuce to be harvested for salads well into November. It is good idea to seed or plant fresh lettuce in late summer and early fall so that the protected plantings of fall are fresh and tender. It is not really worth it, from a culinary perspective, to keep old or bitter lettuce alive. Plus it won't do as well if it is past its prime and won't fend off the cold like a younger planting can.

Hardy greens like kale, mustard greens, collards, etc do not need row cover and can live, unprotected, into December. You can always put some sort of protection over them in November to increase the harvest period past December, but it can be difficult to do with the taller plants. The wind dessicates them and makes them unappealing, and without a larger structure like a cold frame or mini-greenhosue, it can be difficult to give them adequate shelter.

All these attempts at fall crop protection will leave you grateful for the sweet rewards of fresh salads, tomatoes coming out of the cellar ripened and tasty, and nutritious leafy greens sweetened by the kiss of cold.

The Overwintered Garden

“Overwintered” is a term used to describe a vegetable that is planted in the spring, summer or fall of one year in order to be eaten in the spring of the following year. This is a great way to extend the growing and eating season in our Vermont climate. Overwintered crops generally are dormant all winter long and then come back to life with the lengthening days and warming temperatures of spring.

Overwintered Spinach - Not all vegetables can survive our VT winters, but the few that can include spinach, parsnips, leeks, garlic, and parsley. Spinach for early spring eating (mid to late April) should be sown in the first two weeks of September. Once it germinates, allow it to grow without harvesting or touching it. You can eat a little if you want, but ideally you will leave as much of the plant in the ground as possible. Once very cold weather hits, in early to mid-December, you can protect the spinach under a layer of straw, or leaves, or a few layers of thick row cover (Reemay or Agribon can be found at Gardeners’ Supply Company or ordered online at Johnny’s Selected Seeds). In the early spring, as soon as the ground has thawed out, remove the layers of protection and you will see the spinach slowly coming to life, long before any other plants begin to stir. It won’t look like much at first, but will quickly grow to be the size of spinach planted during normal times. It will be extra sweet from having survived the cold and will be incredibly rewarding - a truly vibrant food. This is such a delicious treat for early spring and really worth the trouble.

Overwintered Parsnips- parsnips are a long season crop. They are best when planted in very early spring and harvest the following year. This allows them to grow to a good size and then sweeten up with the cold temperatures. Plant the strange looking seeds in shallow trenches, ¼ inch deep (that is NOT very deep!). Keep well watered and well weeded all summer long. In the fall, you can harvest a few of the larger parsnips to eat September through December, but be sure to elave a few for spring time meals. Once the ground is frozen, in later December, mulch heavily with a layer of straw. The straw moderates the soil temperatures and prevents the soil from buckling and heaving with the freeze and thaw cycles. Pull off all of the mulch as soon as the ground thaws, and then in late April and early May, you can dig up huge, sweet roots that are a lovely addition to spring time soups, roasted vegetable dishes and purees.

Leeks are another crop that is planted very early in spring - mid to late April is ideal. The small and slender plants are planted in trenches, about 6 to 8 inches apart in rows that are 12 inches apart. Keep leeks well watered and weeded. Once they are about 10” tall, you can fertilize them with a good organic fertilizer such as Pro Gro from North Country Organics or Compost Plus from Vermont Compost Company. Then hill up the plants with soil from in between the rows. A good hoe makes this job much easier. The more you hill, the larger the plants will be. This allows for more of the white, edible portion to grow. Hilling also helps to keep the moisture even, another condition which encourages bigger growth. You can hill leeks one more time before fall, in early August or so if you choose to. If you cannot eat all of your leeks in the fall, leave a few in the garden for overwintering. Mulch well with straw (about 6” in depth) and let sit in the garden all winter long. On warmer winter days, you may be able to still harvest some of the leeks if the ground has not frozen solid under the mulch. With whatever leeks are left in the ground come snow melt, pull off the mulch and wait to see what happens. Not all leeks will have successfully lived through the winer, but about 40 to 60% should if you have followed these steps. You will see some yellow and rotting foliage with fresh green growth poking through. These are the leeks that have made it through winter. Let them size up a bit before harvesting. They will come back to life and can be picked and eaten in later April or mid-May. You will have to peel back some of the outer layers, but underneath will be a luscious, silky treat. So sweet in spring, and a great addition to soups, vegetable tarts, or braised meats.

Other crops: I have had good luck with late seedings of lettuce, scallions, cilantro and dill. These all overwintered fine and were good for a few salads in very early spring before they decided to go to seed. The lettuce varieties that I have found to be most well adapted to overwintering are Merveilles des Quatres Saisons, a beautiful French heirloom variety,  and Tango, a green oakleaf. You can also plant shallots and garlic in fall for early harvests. Green garlic is an immature head of garlic that tastes milder than its full grown version.  Parsley is a biennial and will also come back to life in the spring before it goes to seed. Biennials make a flower in their second year, so this is normal plant behavior! Remember, every winter is different. This type of growing requires flexibility, observation, and a willingness to experiment. Exact planting and harvest dates are not easily determined because they are a function of weather, where you garden is sited, and micro climates. The best way to understand overwintering is to start doing it, and see what works well for you. Observe each crops natural life cycle, and learn to work with it in the context of our long and cold winters. There is no better way to say “Hello, Spring!” than by harvesting your first salads in April when green life is just beginning to stir.


Fall Planting Guide

Mid-August is rolling around, and with it comes some vegetable planting possibilities that will feed you late into autumn and early winter. This is a great time to clean out some of the garden beds that have finished producing and replant them with some fresh crops for late season harvest. Here are a few options that you might want to consider incorporating into your later summer gardening routine.

A note on flea beetles and row cover. Flea beetles are little, black and jump around on your plants while making tiny little holes. They love anything in the brassica family - cabbage,broccoli, arugual, mustards, collards, etc. Row cover is a white fabric used to keep out insects and/or to warm up the soil and air around the plants. It does not hurt to use row cover to speed things along and to keep out the flea beetles. Broccoli - seed a small amount directly into garden beds, or buy transplants up to mid-August. If you are direct seeding into a garden bed, remember to thin or prick out and replant the broccoli babies so that they have proper spacing (15” or so). Cabbage - same as broccoli. Choose shorter day varieties. Seed packets usually list the days to maturity for all crops. In early August, you can usually get away with planting a 60 day cabbage that will be ready in early October. Kale - this is a great time to put in a few more kale plants or seeds, they will size up before snow flies, and will withstand lots of wintery weather. The good thing about kale, is that once it is full grown, it will just stand around in the garden waiting to be picked. It does not get “too old” or bolt (jump into seed production mode). This makes it a great early winter crop and a joy to harvest under snow fall. Collards can be treated this way as well. Arugula - a nice addition to salads, this tender green with a mustard-like flavor is also a great survivor of cold temperatures. It can withstand many hard frosts and will continue to add a little spike to your salads well into November and December. You can put row cover on it to keep away the flea beetles and to give it a little extra protection from cold winds that can dry it out. If it starts to turn a little purple in the colder temps, don’t worry about it, it is still fine to eat. This is just a symptom of not being able to absorb phosphorous in cold conditions. Turnips - a short season salad turnip can still be sown in August. I like the Hakurei variety from Johnny’s. It is delicious raw in salads, sliced thinly or finely diced, or sauteed in a little butter with fresh herbs (winter savory makes a special appearance at my house, often in this dish in particular). People who think they hate turnips will just be shocked when they taste these buttery slices that just melt in your mouth. Spinach - in the first half of August, it is a good idea to plant a large patch of spinach. It will germinate in the cooler night time temperatures (spinach does not like to germinate in the heat) and will last a long time in the field in the cool temperatures of October and early November. Carrots - fall carrots are best seeded right around July 4th. This gives you a chance to do an early batch of carrots for late spring, early summer eating, and then a second (or third) batch for fall eating. Fall carrots are considerable sweeter than spring seeded carrots and are definitely worth the trouble. Boc Choi - this is another crop that does really well in the cooler temperatures of fall. It is not a heat lover, and therefore should only be planted in April and May and then again in mid to late August for fall harvest. This benefits from row cover if you have a lot of flea beetle pressure. There are quite a few different versions of boc choi, and if you like the crunchy texture and delicate flavor of this crucifer, then please consider trying baby boc choi, red boc choi, or full sized boc choi. While it is easier to start with plants, it is certainly possible to direct seed this crop. Beets - fall time beets are sweet, tender, and do not have that “dirt” taste of beets grown in full summer heat. Last planting date for fall beets is around August 10th. They should be direct seeded in the garden and then thinned to one plant per 2 to 3 inches. You can space the rows 10 to 12 inches apart and fit about 3 rows in an average bed with a 4 ft width. The greens are tasty too, and the little delicate plants you pull out when thinning are a great addition to sauteed greens, soups, or even salads if very young.

Cilantro and Dill - these herbs can be planted directly in the garden from seed as late as mid-August. They grow well in the cold, and actually prefer it. The cold slows them down and prevents them from going to seed. Plant a good sized patch since you can harvest the plants well into December. They can take a frost, a snow fall and still will bounce right back.

Mustard Greens - these can be planted just like arugula. See instructions above.

Radishes - are a great addition to the late season garden. They can be planted right up to early September, and will maintain a high level of quality right up until it snows.

Lettuce - you can direct seed certain varieties of lettuce for fall harvest. Some do better than others in the cold. I like to plant Merveilles des Quatres Saisons and Tango for their beauty, taste, and cold hardiness.

Parsley - this herb can take very cold temperatures, so make sure, in mid-July or so that you have a nice patch of this going into fall and later summer. If this is an herb that you use frequently, it does not hurt to plant two or three different patches over the course of later April to mid - July. It is a slow grower, so after mid-July you can only plant it from transplants, not seed.


The Fall Garden Confessional

As the owner of a greenhouse business, my gardens are completely neglected between snow melt and late July. This is a problem. Our seasons are short enough as it is, and to lop off about 4 months of key gardening time is a pity. I try to make up for it by making time for the gardens later in the summer and I spend a lot of time on prepping the garden in the fall so that spring planting activities go smoothly and quickly. Early August is a great time to plant or replant the vegetable garden. Throw in some broccoli, lettuces, cabbage, cilantro, salad turnips, radishes, spinach, and even peas. They will be so good in September and October, and you will head into fall feeling like royalty. Rather than see the garden's decline in the heat of late August, you will see a spruced up and abundant second coming. The cool night time temperatures of late Augusst and September are key to a successful fall garden. You can also use this time to fertilize the feed the garden soil (I use Compost Plus) around the annual vegetable plants. They'll reward you with glossy, dark green foliage and scrumptious meals well into late fall.

So as I sit out and look at the raised beds behind my house, I feel better. The overgrown jungle is mowed, the beds are weeded, replanted and looking beautiful. I wish I had more time in spring, but I just don't and I have come to accept it. It's okay, gardening without guilt, right?


Things to Plant Now. You Will be Glad You Did.

August is rolling around, thundering ahead,  and with it comes some vegetable planting possibilities that will feed you late into autumn and early winter. This is a great time to clean out some of the garden beds that have finished producing and replant them with some fresh crops for late season harvest. Here are a few options that you might want to consider incorporating into your later summer gardening routine.

Broccoli

- seed a small amount directly into garden beds, or buy transplants up to mid-August. If you are direct seeding into a garden bed, remember to thin or prick out and replant the broccoli babies so that they have proper spacing (15” or so).

Cabbage

- same as broccoli. Choose shorter day varieties. Seed packets usually list the days to maturity for all crops. In early August, you can usually get away with planting a 60 day cabbage that will be ready in early October.

Kale -

this is a great time to put in a few more kale plants or seeds, they will size up before snow flies, and will withstand lots of wintery weather. The good thing about kale, is that once it is full grown, it will just stand around in the garden waiting to be picked. It does not get “too old” or bolt (jump into seed production mode). This makes it a great early winter crop and a joy to harvest under snow fall. Collards can be treated this way as well. A note on flea beetles: It does not hurt to use row cover to speed things along and to keep out the flea beetles. They are little biting insects that make little holes in the leaves and generally slow down a plant’s growth by stressing it a bit. All vegetables in the brassica family are susceptible to flea beetles - broccoli, kale, cabbage, mustards, arugula, collard greens, and boc choi are all in this family.

Arugula -

a nice addition to salads, this tender green with a mustard-like flavor is also a great survivor of cold temperatures. It can withstand many hard frosts and will continue to add a little spike to your salads well into November and December. You can put row cover on it to keep away the flea beetles and to give it a little extra protection from cold winds that can dry it out. If it starts to turn a little purple in the colder temps, don’t worry about it, it is still fine to eat. This is just a symptom of not being able to absorb phosphorous in cold conditions.

Turnips

- a short season salad turnip can still be sown in August. I like the Hakurei variety from Johnny’s. It is delicious raw in salads, sliced thinly or finely diced, or sauteed in a little butter with fresh herbs (winter savory makes a special appearance at my house, often in this dish in particular). People who think they hate turnips will just be shocked when they taste these buttery slices that just melt in your mouth.

Spinach

- in the first half of August, it is a good idea to plant a large patch of spinach. It will germinate in the cooler night time temperatures (spinach does not like to germinate in the heat) and will last a long time in the field in the cool temperatures of October and early November.

Overwintered Spinach - overwintering means keeping a vegetable alive through the winter for spring harvesting and eating. Not all vegetables can survive our VT winters, but the few that can include spinach, parsnips, leeks, garlic, and parsley. Spinach for early spring eating (mid to late April) should be sown in the first two weeks of September. Once it germinates, allow it to grow without harvesting or touching it. You can eat a little if you want, but ideally you will leave as much of the plant in the ground as possible. Once very cold weather hits, in early to mid-December, you can protect the spinach under a layer of straw, or leaves, or a few layers of row cover. In the spring, as soon as the ground has thawed out, remove the layers of protection and you will see the spinach come to life, long before any other plants begin to stir. This is such a delicious treat for early spring and really worth the trouble. A future post will be just about overwintered vegetables, so if this is something you have been wanting to try in your garden, check back here in a few days!

Cilantro and Dill

are good herbs for fall planting since their cold-hardiness is unmatched, and it will give you something to add to autumn salsas, salads, and pickles. Just sprinkle some seed into a shallow trench, press them in, and lightly cover with soil. The planting depth is very shallow here, just 1/4 inch or so. One of the most common problems with crops seeded directly into garden soil, is that they get planted too deeply. Remember this basic rule of thumb: the seed needs to be planted only 2 times deeper than its own size. Cilantro and dill will live until the first snow! They thrive in the cold. They are true soldiers of season extension.

Let us know if you feel inspired to try your hand with some of this season extension - we love to hear about it!

Managing Garden Pests: Cucurbits (Squash Family)

The problem with plants that taste good to us is that they also taste good to a variety of insects. These bugs can suck the juices out of the plant, chew big ugly holes, and transmit diseases.  Because plants in the squash family (melons, cucumbers, squashes, and zucchinis) are very juicy and sweet, bugs love them. But don't despair! We can help you identify and manage these pests so you can bring in the bounty. Cucumber Beetles

These pesky little creatures are about 1/4 inch long with yellow and black stripes. They love to chew cucurbit leaves until they look like lace. They fly but tend to fall off the leaf when you disturb it, so put your hand underneath to catch them. Squish the beetles and look for their orange eggs laid in the soil around the plant. You can often catch them in pollinated squash flowers, then just squish or drop in a bucket of ammonia, kerosene, or other poison. For serious infestations, spray plants with pyrethrum (a botanical pesticide) every 3-4 days.

Squash Bugs

These large bugs are often found in pairs on squash family plants. They are brown or black, shield-shaped, and about 3/4 inch long. They lay very shiny reddish eggs on the undersides of leaves. They can be easily controlled by squishing or with applications of insecticidal soap. Making a small moat of wood ashes around the plants will control the bugs as well, since they hate walking over the ashes. Just make sure not to get any ash on the plants!

Aphids

Aphids are one of the most common garden pests. They can be difficult to see because they are very small and often green or tan in color. They suck the sap of the tender young foliage and undersides of leaves. If you see ants on your squash family plants, you probably have aphids, since ants are attracted to the honeydew produced by aphids. A variety of methods for managing aphids are available. The best remedy is to squish them when you find them. You can also make "bug juice" by mixing the squished bugs with water and spraying the plants. A spray made of ground garlic, onions, or hot pepper can also be used to repel aphids. Insecticidal  soap or horticultural oil can be used as a last resort.

Flea Beetles

Flea beetles are not as common on cucurbits as they are on plants in the cabbage or mustard families, but they can do damage. They are very small, about the same size as an aphid, and shiny black. They jump like fleas when disturbed and make zillions of tiny holes in leaves. Flea beetles can be repelled using row covers, hot pepper, or garlic sprays, and as a last resort can be killed with pyrethrum.

This Week in Photos - June 29th, 2011

It's getting to be that time in the season when there's more time for fun projects - the vegetable garden is in, and with the exception of weeding and succession planting, one can finally delve into the beauty and creative freedom of flower gardening. And just in time, as if by magic, the first rudbeckia unfurls its yellow petals, the astilbe raises its frothy plumes, and the daylilies unpack their sweet blossoms as if to say, "I'm out in the world now! Come play!" Our perennials look more dazzling than ever (and with our sale,  they're also a steal)! If you'd like to learn about perennial selection and maintenance, our resident gardening expert, Hope Johnson, will be teaching a free workshop at our greenhouses on Saturday, July 16th from 9-11am. Come with your gardening questions, hopes, and dreams!

We still have lots of beautiful annuals for tumbling over window boxes, making bouquets, twisting into braids or brightening a veggie garden - whatever suits your fancy!

Managing Disease in the Garden: Powdery Mildew

Well, it's that time of year when we start getting lots of calls and questions about common garden diseases and pests. This post will be the first in a series focusing on how to manage these issues when they arise so that they don't get out of hand. It is wise to pay careful attention to your plants - sometimes small changes in their appearance can indicate a potential problem. The internet is a wonderful resource for solving your garden mysteries, but a good gardening book like Rodale's is indispensable for the serious gardener. If neither resource is available to you, don't hesitate to call us and we can help you troubleshoot! What is Powdery Mildew (PM)?

Powdery mildew is a white fungus that mainly affects plants in the squash family (cucumbers, melons, zucchinis, etc.) but can also affect other families as well. It first appears on the undersides of leaves as white dots, which expand until the whole leaf looks like it's been dusted with a white powder.

What causes PM?

Garden fungi are propagated by spores that fly on the air, which makes them difficult to prevent. The fungi are more likely to grow on plants with a lot of moisture in and on their leaves, and in humid conditions with too little air circulation. It is also carried from plant to plant by insect pests such as squash bugs, cucumber beetles, aphids, and flea beetles, so managing these pests helps reduce the prevalence of PM.

How do I prevent PM?

- Check for insect pests every few days. Squish the pests when you find them, and make sure to look for and destroy their eggs as well. A little vigilance goes a long way!

- Space plants further apart so that the sun can hit all parts of the plant, and air can move easily through.

- Only water in the morning, when plants will have plenty of time to dry during the day.

- Practice good crop rotation. Never put plants in the squash family in the same place as they were the year before.

How do I manage PM once I have it?

Powdery mildew does not usually kill a plant unless it is also suffering from pests. However, the two often go hand in hand, so it is wise to manage it when you see it. Here's what to do:

- Remove the worst-infected leaves with a pair of scissors or pruners. DO NOT put the infected leaves in your compost pile! Either burn them or put them in the trash. After pruning, wash your hands and tools with soapy water or a dilute bleach solution before touching other plants.

- Spraying with a sulfur- or copper-based fungicide once a week on the top and undersides of the leaves will eliminate most of the fungus. Follow this regimen up until 2 weeks before harvest. Alternatively, a mixture of 1 teaspoon of baking soda per quart of water can also be used. Try to spray only in the morning, when the leaves will have plenty of time to dry in the sun.

A Child's Garden

Growing up surrounded by gardeners, it was impossible not to become one myself. However, my childhood self did not always appreciate what I now consider to be relaxing activities - planting, weeding, and shelling peas were chores, plain and simple. Looking back I wish I had had a little garden space of my own - to experiment, observe, and play, without anybody ordering me around. At Red Wagon we are nurturing our inner child by creating a garden that appeals to children (and to us!)...there is a little stone path down the middle that leads up to a big boulder for climbing on, and, as of yesterday, we have a bean teepee. We put the teepee together in less than an hour with minimal materials, and it has already generated excitement among the kids visiting our greenhouse. We planted ours with purple hyacinth beans and Irish moss on the inside, to make a comfy place to sit.

If you'd like to make a bean teepee yourself, here's how:

Take three bamboo or wooden poles (ours were 8'), and push them into the ground in a triangle. It helps to have one person on a ladder holding the poles together in the middle, with the other person positioning them in the ground. Take some twine and wrap it around the three poles at the top until they're good and sturdy. Then, using more twine, make four to six strands reaching down to the ground and secure with stakes along two of the three sides of the teepee (leave one side open so little people can go in and out). Then make a net by weaving strands of twine horizontally around the poles and twine, securing to the poles as you go. When you're finished, plant your beans around the two sides of the teepee and voila, you're done!

Enjoy!

- Sophia

Our Plants in New Places

We had a great week last week and met up with lots of new customers at a few new venues. Fletcher Allen Health Care in Burlington is a leader amongst hospitals around the country for taking health, well being, and green living seriously. Their nutrition and dining services people use local foods, they have a beautiful garden on the roof top, and multiple gardens on the various campuses where herbs, salad greens and other vegetables are grown for the kitchens. The staff is dedicated and enthusiastic - so much so that they asked us to provide plants for a plant sale last week which was a huge success! Here are a few pictures from the sale:

I have to say, that when I dropped off the plants, I was sure that there were way too many, but those amazing women sold so many plants! There were only a few trays left at the end of the day. This will be an annual tradition hopefully and we can get a chance to talk gardening with all the hospital employees again next year. Ally sent along a sweet note this morning:

Hi Julie & Awesome Greenhouse Crew,

We had a blast at the hospital plant sale and so did all the employees, patients, and visitors who stopped by.  Everyone commented on how great the plants looked. Even our executive chef ended up adding some  impulse purchases to his list for the hospital's gardens!  Thanks to Eric for stopping by with more signs, and to Julie for her expert gardening advice, and to everyone at Red Wagon who contributed towards growing such healthy plants.  I've included some pictures from the first hour of the sale.  I wish we'd thought to get some shots of the empty tables at the end of the day.  Even then, with slim pickings left and the cash registers shut down, people kept trying to buy plants!  Thanks again, Ali